Minicade 1/2 Guide

1. NAVIGATION
Navigation is simple and most inputs are shown at the bottom of the screen and correlate to the 6 buttons next to the joystick as shown here.
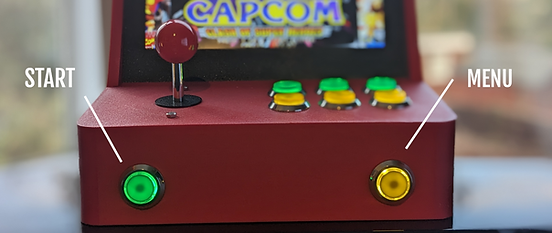
The other 2 main buttons are START and MENU and are the two buttons on the front of the Minicade. To exit a game hold both these buttons at the same time.
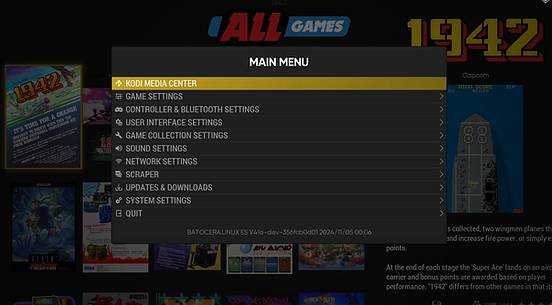
START brings up the main menu. Here you can configure everything from volume to themes, layouts and WiFi.
MENU brings up the view and search options for quick access.
2. ADDING GAMES
Some users and myself have had a problem where the arcade does not show up under networks in windows 11. If this happens try to reset your laptop/pc, the arcade and your router.
Adding your own games is easy and done with a laptop or PC over Wifi. First make sure the Minicade is connected to the same network as your computer.
Then navigate to your computers network window as shown here.
In your computers network you should see a shared network called MINICADE. You will be asked for a user name and password when you try to access the Minicade.
USER : root
PASSWORD : linux
Then go into the share folder.
Navigate to the roms folder. Inside you will find separate folders for every single gaming system.
Now just drag what ever rom file you have to the system it is for. For example, if you have a Nintendo 64 game drag the rom to the n64 folder. You are finished with the computer and can finish the process on the Minicade.
On the Minicade press the START button to open the main menu and navigate to GAME SETTINGS.
Now select the first option UPDATE GAMELISTS. You will get a prompt stating are you sure, select YES. Now the game you added will show up in the game list.
3. SCRAPING
Scraping is the process of scanning your game list and pulling related media (logos, box art, videos) for each game to populate the UI.
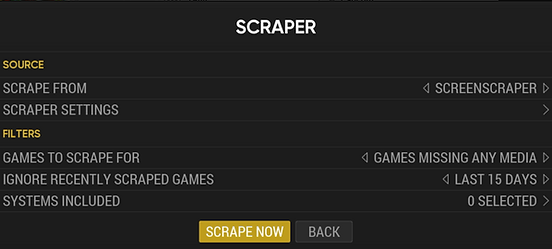
Firstly connect your machine to WiFi. Then bring up the main menu and navigate to the SCRAPER option.
Scrape from is the source that is going to be checked for media. There
are several different options, if no media for your game is found try scraping from different sources. Some sources require you to create an account for the associated site.
Now go to the SCRAPE NOW option and the system will automatically look for and download any missing media.
Before any new media will be displayed you must UPDATE GAMELISTS as explained in the ADDING GAMES section.
4. KID MODE
If you need to prevent children changing settings or accessing certain games you can use KID mode. This mode locks setting menus and games behind a keycode lock.
First bring up the MAIN MENU and navigate to SYSTEM SETTINGS.
Now navigate to USER INTERFACE MODE and choose KID. Next, return to the MAIN MENU and a message will appear asking if you want to proceed with the unlock code.
Make a note of the code and select YES. The system is now in KID mode, no settings are available and only games set to KID will be listed.
Now the MAIN MENU will only show the following.
To leave KID mode select UNLOCK USER INTERFACE MODE and you will see ENTER THE CODE NOW TO UNLOCK. On this screen enter the code given when KID mode was enabled.
A, A, A, B, A
The diagram below shows where the A and B buttons are located amongst the 6 panel buttons.
O O O
O O O
^ ^
B A
Now the system will be back in FULL INTERFACE MODE.
To add a game to KID mode navigate to the game you wish to add and hold the B button to bring up the GAME MENU. Then navigate to EDIT THIS GAMES METADATA.
Scroll down to the bottom of this menu and you will see an option called KIDGAME. Switch this to on and then go to SAVE.
Now the game will be listed when the system is set to KID mode. This must be done per game.